MailPoet is one of the most popular email marketing solutions for WordPress. It has a very good integration with WooCommerce and many sites will ask shoppers to sign up to an email newsletter at checkout. However, there is a MailPoet and WooCommerce unsubscribe issue. This blog will detail what the issue is and how you can overcome it.
MailPoet is a plugin for WordPress that allows users to create and send email newsletters and automated emails from within their WordPress site. It can be used to create and manage mailing lists, design and send newsletters, and track the success of email campaigns. The plugin also includes features such as a built-in WYSIWYG editor for designing newsletters, integration with popular email service providers, and support for sending automated emails, such as welcome messages or abandoned cart reminders. It also can be integrated with Woocommerce, to create, send and track email marketing campaigns from the woocommerce store.
It has a free plan which allows 1,000 subscribers to be signed up before needing to purchase a subscription. This is one of the most generous free plans out of all email marketing solutions for WordPress.
What is the MailPoet WooCommerce unsibscribe problem?
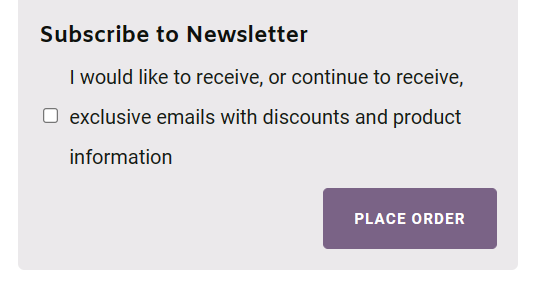
MailPoet has very strong integration with WooCommerce, including an option to sign up shoppers to a newsletter on checkout:
This works really well, however there is a problem. Let's walk through this scenario:
A new user purchases a product and checks the box to sign up to the newsletter
The user is added to the newsletter once they've confirmed their email address (if enabled)
A little while later, the same user places another order with the vendor. This time, they do not check the newsletter sign up box as they know they are already subscribed
MailPoet will now unsubscribe the user from the newsletter - PROBLEM!
The MailPoet Woocommerce unsubscribe problem can be described as:
If a returning shopper fails to check the newsletter sign up box on WooCommerce checkout, MailPoet will automatically unsubscribe them from the newsletter. Mailpoet treats the failure to check the sign up box as an implicit unsubcribe action.
You've worked hard to build up your subscriber list and now MailPoet, for most of us, is making an incorrect determination on how to handle an unchecked sign up box. Luckily there is a solution.
How to fix the MailPoet Woocommerce unsubscribe problem?
The third party plugin Add-On WooCommerce - MailPoet 3 can be used to overcome this problem. The first thing to do it is install this plugin to you WordPress site.
Next, go to your MailPoet --> WooCommerce settings and uncheck the 'Opt-in on checkout' setting:
You now need to configure the Add-On WooCommerce - MailPoet 3 plugin. To do this, you can find the settings in WooCommerce --> Settings --> MailPoet. Check 'Enable Subscription' and the relevant options below it:
In the free version of this plugin, multi-subscription is not enabled. So go to the 'Available Lists' tab and ensure the newsletter you want shoppers to subscribe to is selected:
That's it. Now any returning shopper who does not select the newsletter opt-in will not be unsubscribed from your newsletter.
Summary
MailPoet is a great email marketing tool with very good integration with WooCommerce. It has an annoying problem when returning shoppers will be unsusbscribed from your mailing lists if they do not check the newsletter signup box every time they place an order. Using the Add-On WooCommerce - MailPoet 3 plugin from Tikweb allows you to overcome this problem and keep users subscribed to your mailing lists, even if they do not check the 'subscribe' box on subsequent orders.
Do you need help with your email marketing or your WordPress / WooCommerce site? Reach out to Web X Design Studio for a free chat about your needs. Why not join are growing list of happy customers?
I subscribe to Freepik for premium images for use on my and on my clients' website builds. Freepik provides a wide variety of high-quality vector images as well. My design tool is Affinity Designer, but if you try to open up the freepik .eps vector file directly, this is what it will look like:
Broken Freepik .eps vector in Affinity Designer
The vector is broken into a checkerboard and is impossible to edit. Freepik is adding some data to the vector file which doesn't make it directly compatible with Affinity, but with an intermediary step, you can edit these correctly with Affinity.
The trick is to import them into Photopea and then export them as. Open the file in Photopea:
Open the Freepik .eps file in PhotopeaIn Photopea, 'Save as PSD'
Now go to 'File' and 'Save as PSD'. That's all you need to do in Photopea. The .PSD file can now be opened in Affinity and edited as you would any other vector:
Freepik vector now editable in Affinity Designer
Introduction
A Content Delivery Network (CDN) can speed up your website by:
delivering content from 'edge servers' which are close to your visitors e.g. if you server is in the UK and your visitor is in Australia, a CDN will likely deliver the content to your visitor from an edge server in Australia
reducing the load on your web server. As most content will be delivered from the edge servers, your web server has to do much less work
There are many CDN vendors for you to choose from including the likes of Cloudfare and Bunny. This guide will show you how to configure your WordPress site to use the CloudFront CDN from Amazon Web Services (AWS).
Why Choose AWS CLoudFront CDN?
CloudFront is a great choice as it has over 300 edge server locations, which means that no matter where in the world your visitors are coming from, there will be an edge server close to them.
CloudFront also makes it economical to get going, and for low usage sites, it could be totally free for you. Each month the first 1TB of outbound traffic is free. Traffic over 1TB is then charged per TB.
Being built within the overall Amazon Web Services network, you can also be sure that this is going to be a reliable, available and well-supported service.
AWS CloudFront Configuration
This guide will document what you need to configure in CloudFront to use with your WordPress site that is not hosted at AWS itself. If you are hosting your WordPress site in AWS, you will likely need a slightly different configuration.
Once you have created or logged in to your AWS account, search for CloudFront and go to the CloudFront service:
Creating a CloudFront Distribution
You'll need to create a CloudFront Distribution. Go to 'Distributions' and click on 'Create distribution':
The following settings work well for me, depending on your configuration, you may need to change these. Give these a go first of all:
Origin Domain: Enter the URL of your WordPress site
Protocol: I only use HTTPS so am choosing HTTPS only
Minimum Origin SSL protocol: I leave this as the default of TLSv1
Name: Give a meaningful name e.g. the name of your website
Enable Origin Shield: this is optional, but I enable and choose the location closest to my host server (London)
Additional Settings: I leave these all as the default
Compress objects automatically: I leave the default of yes
Viewer protocol policy: I only need HTTPS
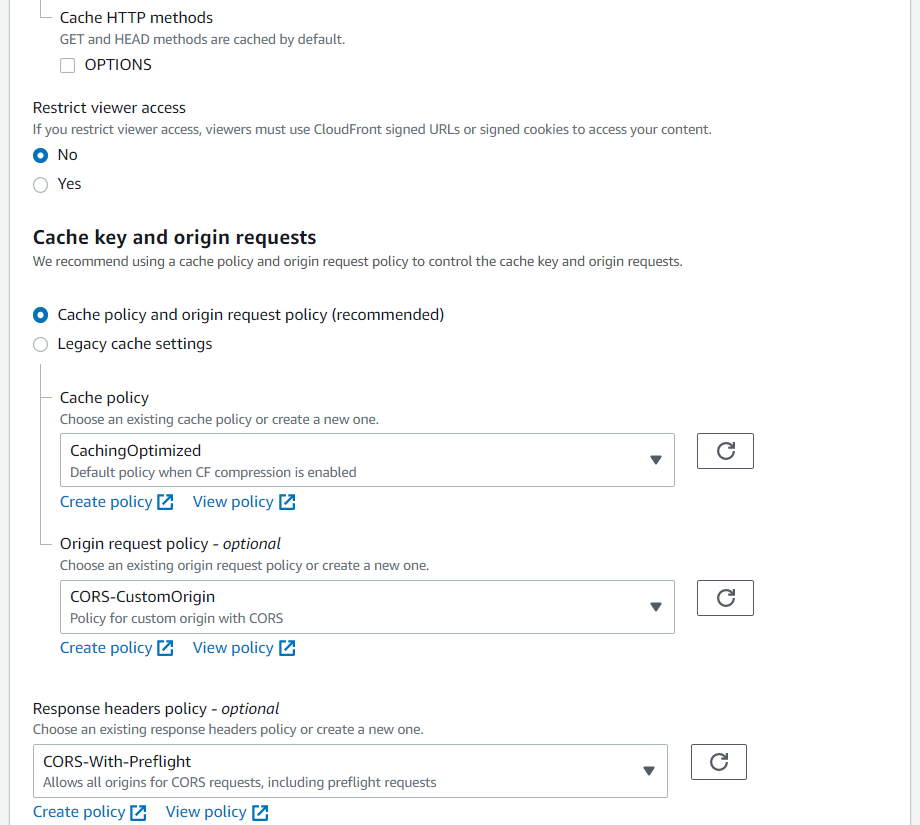
Allowed HTTP methods: Select the third option
Select 'Cache policy and origina request policy'
Cache policy: CachingOptimized
Origin request policy: CORS-CustomOrigin
Response headers policy: CORS-With-Preflight
If you do not make these selections you may end up with errors stating that content has been blocked by CORS policy: No ‘Access-Control-Allow-Origin’ header is present on the requested resource.
I use the default settings above
I use the default settings above
Description: an optional setting, but I set it to the name of the website
Click on 'Create Distribution and the distribution will be created. It can take a few minutes. Copy the 'Distribution domain name' as that's what you'll need to enter in to LiteSpeed or other WordPress caching plugins:
Configuring LiteSpeed Cache with CloudFront CDN
If you have not done so already, install the LiteSpeed Cache WordPress plugin. There are many optimisation settings within LiteSpeed, but this guide will just focus on the CDN. Goto the LiteSpeed CDN page:
QUIC.cloud CDN: OFF
Use CDN Mapping: ON
CDN URL: Enter the CloudFront distribution domain name you copied from the previous step
Leave everthing else as default settings
Original URLs: Enter the URL to be served through the CDN, this is your website URL and needs to be entered in this format:
//domainname.com/
Note the trailing /
Exclude Path: I have a few paths I do not want to go through the CDN, so add them in here
Hosting Google Fonts in CloudFront
If you are using Google Fonts, it makes sense to host them in CloudFront along with your other files. I use Perfmatters alongside LiteSpeed:
On the Fonts tab:
Display Swap: On
Local Google Fonts: On
CDN URL: the Cloudfront distribution domain name
Checking CloudFront Is In Use
The first thing to do is to purge the LiteSpeed cache. This is particularly important if are reconfiguring LiteSpeed. Once purged, go to your website, and open up your browsers developer tools:
Select 'sources' and if necessary refresh the page. Looking in the sources you should see the CloudFront distribution domain name and if you expand it out, you will see the content being served through CloudFront.
You want your email address on your website for customers to easily contact you, but you don't want a ton of spam coming through. If you don't take steps to protect the email address, spambots will inundate you with unwanted emails. Luckily for us, WordPress has an anti-spambot function that we can easily take advantage of within Oxygen Builder.
Add in a text link element to your page. For the URL enter:
Clicking on the email address will open your favourite email client with the subject automatically set.
If you look at the source code for the page, you will see that the email address is obfuscated with hex codes:
The spam bots look at the source code, not the frontend, so this now means you can safely add your email address to your website and be safe in the knowledge the bots will not spam you.
Oxygen has recently released a Floating Icon Menu as part of their composite elements. It works great! It doesn't automatically close when a child menu icon is clicked through. This guide will show you how to do that.
On my main site I have the Floating Icon Menu configured as such:
Closed
Open
When you add a Floating Icon Menu, you will see something like this in the structure panel:
It's the javascript of the 'Floating Icon Menu Code' element you will need to edit. By default it will look like this:
To automatically close the floating icon menu on a click of any of the child menu elements, you will need to add and modify the following code below the existing javascript:
function Close_Floating_Menu(){
  floatingMenuIcon.classList.remove('oxel_floating_icon_menu__main_icon--active')
}

document.getElementById("link-180-51").onclick=Close_Floating_Menu;
document.getElementById("link-177-51").onclick=Close_Floating_Menu;
The link id's are those of the link wrappers of the child menu elements. In my case, those labelled 'WhatsApp' and 'message' in the structure panel detailed above. If you have more than 2 child menu elements, then ensure you add a 'Close_Floating_Menu' line for each child menu you have. My final code looks like this:
This is my first time writing any javascript, so it may not be optimal. If you find a better way to do this, then please comment below. Perhaps Oxygen will add this capability in a future release??
This article will show you how to configure the popular WordPress backup plugin - UpdraftPlus - to use Amazon S3 storage. Hosting provider backups should never be relied upon. They are stored in the same location as your website. If anything happens to that location, you lose your website and your backups i.e. you're fu**ed!
There are many reasons to use Amazon Web Services (AWS) S3 Storage, not least, cost -which I will talk about in another blog post. To get started with AWS, you will need to create an AWS account if you do not already have one.
You need to create a 'bucket' which is a storage area for your backup to go to. Select 'Create bucket':
You need to name your bucket. This must be unique across AWS, so the name I initially chose below was rejected.
You can create a bucket in most of the AWS locations. The US locations are a little cheaper to use, but being based in the UK, I am using their London location. This helps with network latency, but also jurisdictional regulations.
You can leave all the other settings as default on the 'create bucket' page:
Now your bucket has been created, you need to create a user, think service account, that UpdraftPlus will use to communicate with AWS
In the top right of the console, select your account name and then 'My Security Credentials' on the drop down:
Select 'Users' and then 'Add User'
Enter the 'user name' you would like to use and select the 'access type' as 'Programmatic access':
The user needs permissions to operate within AWS. As with all permissions, less is better. I've selected 'AmazonS3FullAccess' for both permissions and the permissions boundary:
tags are optional, and if you are only using this bucket for UpdraftPlus may be a little redundant, but I still have chosen to add a tag:
That's it, review any warning or error messages that may be displayed, Otherwise, you should be good to go:
To configure UpdraftPlus to write to AWS S3, you need the 'Access Key', the 'Secret Access key' and the bucket name:
Head over to WordPress and the UpdraftPlus settings
Select 'Amazon S3' and enter in the access key, secret key and location (bucket name):
Hit the 'Test S3 Settings' button and if everything is good, that will come back with a success message
Now, all future backups will be written to your AWS S3 bucket. Ensure you do not store too many copies (I'm storing 7 days' worth) otherwise your costs will increase. And remember, it is no good creating a backup if you do not know how to restore that backup, or if the backup copy is not good for any reason. Periodic restores for all your sites (to a temporary WordPress installation) should be performed. You don't want to end up in a disaster scenario not knowing how to restore, or not having any working backups. I'll add a restore process in another blog post.
Google has released their Material Icons which contains more than 1,400 icons. This guide will show you how to add them in to Oxygen Builder.
You need to create an SVG design set to import into Oxygen. The easiest way to do this is to use IcoMoon or download the design set I've created using this method from here. Scroll down and find the Material icons:
Click on 'Add' and on the next screen, select 'select all' from the hamburger menu in the top right. Of course, if you do not want all the icons, you can just select the ones you are interested in:
To generate the SVG design set, select 'Generate SCG & More' from the bottom of the screen (this may take a little time):
Click on the little gear icon, give the design set a name and ensure 'Add <title> to definitions in symbols-defs.svg' is selected:
Close the window and 'download' the design set. Extract the files from the zip that you have downloaded. You have all the icons in SVG and PNG format, but what you are looking for is the symbol-dev.svg file in the root folder. If you do not want to go through the above process, you can download the design set from here.
The design set needs to be added into Oxygen now. Go to Oxygen --> Settings --> SVG Sets. Enter a name for the set, and select the design set SVG file you have either generated or downloaded:
Now, when adding an icon to your page, you can select the Google Material Icons:
I want to apply some consistent styling to images within blog posts i.e. a shadow. Now I expect this could be done with a class through the Gutenberg editor, but a simple piece of CSS styling within the blog page template does what I need.
This is the current structure of my blog post template:
To add in the styling for the images (well it can be used for any elements), add in a code block at the top of the inner content, with code such as:
Now all images on my posts will have a shadow and be center aligned. Targeting just the inner content will prevent the shadow from being applied to images like the logo in the header or footer sections.
You want to scroll to a particular place on a page? Then you need an anchor link. How do you add anchor links within Oxygen Builder?
First of all, each element has an 'id' and you could link directly to that id. For the element below, I could link directly to #code_block-79-51
However, that is not very meaningful. If you want to have a meaningful name for the anchor link, add in a 'code block' to the div you which to link to. Add in the following HTML code to create a hidden anchor link:
<a id="name-of-anchor-link"></a>
e.g.
If you want a visible anchor link, modify the code to be:
<a id="name-of-anchor-link">Visible Anchor Link Text</a>
To link through to the anchor link, just use #name-of-anchor-link e.g.
Bit Form is a new flexible form builder for WordPress. It's currently available for an extremely attractive lifetime deal (i.e. $30 for 50 sites or $50 for 1,000 sites). It supports Google reCAPTCHA to prevent spam messages, but there are no details on how to configure it. If you do not set it up properly, you will see 'ERROR for site owner: Invalid site key':
Follow these steps to configure Bit Form and Bit Form Pro to work with Google reCAPTCHA:
Logon to reCaptch admin and in the top right corner, click '+' to add a new site. Fill in the form. Note Bit Form currently just support reCAPTCHA v2 but v3 is on their roadmap:
Once you click 'submit' your reCAPTCHA site and secret key will be displayed:
Go back to WordPress, and click on 'Bit Form' in the left-hand menu. Under reCAPTCHA copy and paste in the site and secret keys from above:
Now when you publish your contact form, reCAPTCHA will be working as expected:
Do you want to showcase your portfolio in laptop, tablet and mobile phone device mockups? This video tutorial from Permaslug will walk you through. Here's step by step instructions, along with a couple of points I found out along the way:
If you haven't already, add in the 'code snippet' plugin to WordPress
Clone the example CSS snippet, paste in the code from here. Hint, ensure you leave the header and footer code from the example and just paste over the highlighted text in this image:
Under the code you have just pasted, select 'Run Snippet Everywhere' and save it.
Create a second snippet (no need to clone anything here) and paste in the code from here
Set to 'Run Snippet Everywhere' as well.
Devices that are currently supported:
You'll need the names and colours for the short codes you are about to apply
Now on any Oxygen page, add in a shortcode wrapper and enter the following shortcode
Note that device needs to be in lowercase, as does the colour (not color). Be sure to explicitly include a colour, otherwise the frontend display may not work correctly.
You can now add content and it will be displayed within the device. It's best to wrap the content you want to display in a div. The content is unlikely to display correctly in the backend, so wrapping in a div allows you to move it 'in and out' of the shortcut wrapper to see what it actually looks like. Here's what I did with an image:
The image is not displaying, but if you look on the frontend it is right there in the device. Note you may need to change the 'size' of the image to have it displayed correctly. As it stands this is what you will see:
There is a scroll bar on the right-hand side which you may want to remove. Add a code block within shortcode-wrapper (not the div) and enter the following CSS code:
Add this as a completely new stylesheet into Oxygen, or if you only want one or two effects, find the effects code you want and copy and paste into a custom stylesheet.
The code needed is commented with the name of the effect. Copy and paste until the next comment e.g.:
I add this into a stylesheet I call 'CustomCode'
Now on each button, I add in the class of 'hvr-underline-from-center' and the hover effect applies:
You can try out the effect with the button below. Of course, if you don't like the colours, sizes etc. you can modify these in the code you entered into the stylesheet:
As you can see by hovering over this text, the effect can apply to many different elements, not just buttons
In my blog listing page, I wanted the blog image as a div background, with the heading aligned to the top of the div and the date and 'read more' button aligned to the bottom of the page.
This proved much easier to achieve than what I first thought. In Oxygen builder, set the Vertical Item Alignment of the containing div to be 'Space Between':
Ensure you have more than 2 child elements in the containing div, wrap individual elements in divs as necessary, add some margin and this is the end result:
A very simple way to ensure the top and bottom child elements are all aligned.
How do you take a "screenshot" of an entire web page? The visible section and the content below the fold? Maybe you want to highlight your web design portfolio or share the full page with your clients.
There's an easy way to do this via Chrome or Edge extensions. I use the free extension GoFullPage. Once installed you will have this little camera icon on your toolbar:
Clicking on it immediately takes a full-page screenshot of your site. Here are the results of one of my sites:
To take a full screenshot of a mobile screen, you do not have to capture on a mobile device. Reduce the width of your desktop browser and you will have the simulation of the mobile display which can be captured using the same method.
With this blog, many times I will want to paste code snippets. Building the blog content and adding a code snippet is easy within the Gutenburg editor. When displaying in my Oxygen Builder Post template, the default code block styling was looking like:
The code in the middle is hard to differentiate from the paragraph text - top and bottom line in the image.
Oxygen does not provide a means to customise the code block styling from within the UI, but this can easily be changed within a stylesheet. I always create a 'CustomCode' stylesheet from the Oxygen 'Manage' menu:
I want to change the styling of the code block to make it stand out more and to change the code display font to Courier. Add this to your CustomCode sytlesheet:
Much clearer I think you'll agree. Of course, you can vary the styling to get the right effect for yourselves.
I've used the free SEO plugin, SmartCrawl by WPMU Dev previously when using the Divi them builder. I liked it and preferred it to Yoast. To me, the free version had more capabilities than the free version of Yoast. I also preferred the user experience of SmartCrawl.
On switching to Oxygen Builder, I wanted to carry on using SmartCrawl. Out of the box, I found it not to be 100% compatible. The SEO and Readability scoring on pages, posts etc. was not showing. I found this article, but it was not totally clear what needed to be done.
Here I'll detail the steps I took to get SmartCrawl working smoothly with Oxygen Builder:
Install and activate SmartCrawl as you would any other plugin
Create a 'Must Use' mu-plugin which will set a filter which ensure the Readability Score works:
Create a file called 'smartcrawl.php' in /wp-content/mu-plugins. Create the folder if it does not already exist. Note: the file can be called anything, but must be a .php extension
Add the code below to the file, save it and change the permissions to 604:
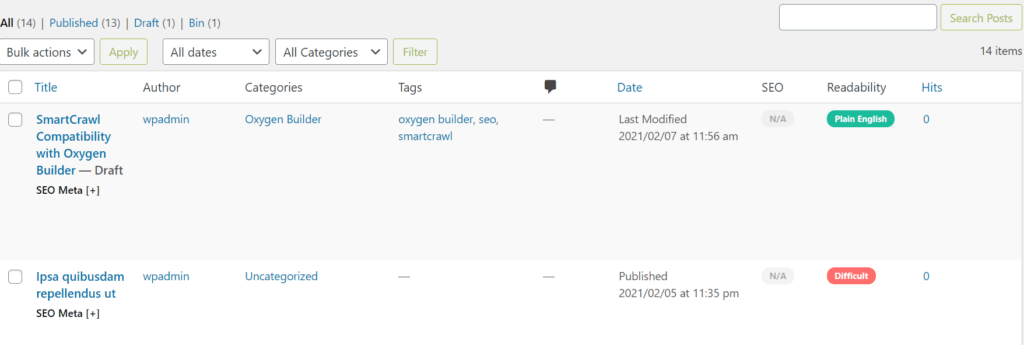
That's it. If you look at you installed plugins, under 'Must Use', you will see the filter you've just created:
If you look at any of your pages, or posts, you will now see the Readability Score:
Since creating my first site where I encountered this issue, I have seen SmartCrawl and Oxygen Builder "play nice" out of the box. So only apply this filter if you are having problems displaying the Readability score.
We use cookies to optimise our website and our service. It helps us if you allow them, but you can manage what cookies you allow through preferences.
Functional
Always active
The technical storage or access is strictly necessary for the legitimate purpose of enabling the use of a specific service explicitly requested by the subscriber or user, or for the sole purpose of carrying out the transmission of a communication over an electronic communications network.
Preferences
The technical storage or access is necessary for the legitimate purpose of storing preferences that are not requested by the subscriber or user.
Statistics
The technical storage or access that is used exclusively for statistical purposes.The technical storage or access that is used exclusively for anonymous statistical purposes. Without a subpoena, voluntary compliance on the part of your Internet Service Provider, or additional records from a third party, information stored or retrieved for this purpose alone cannot usually be used to identify you.
Marketing
The technical storage or access is required to create user profiles to send advertising, or to track the user on a website or across several websites for similar marketing purposes.